Task schemas
What is a schema
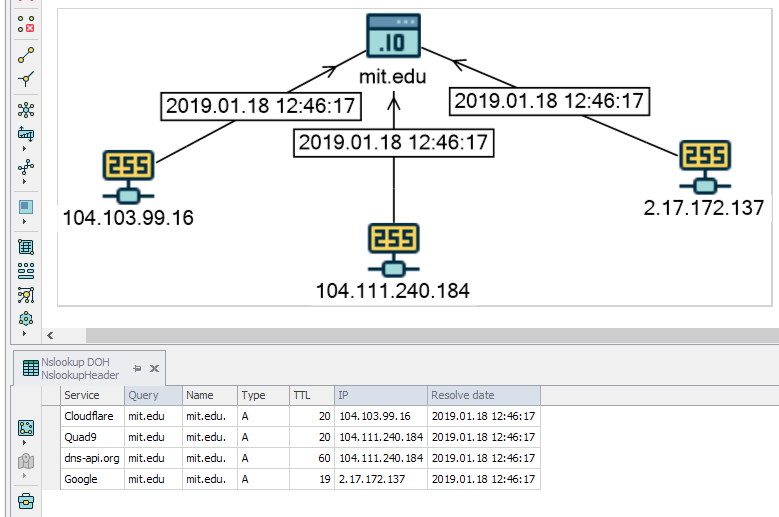
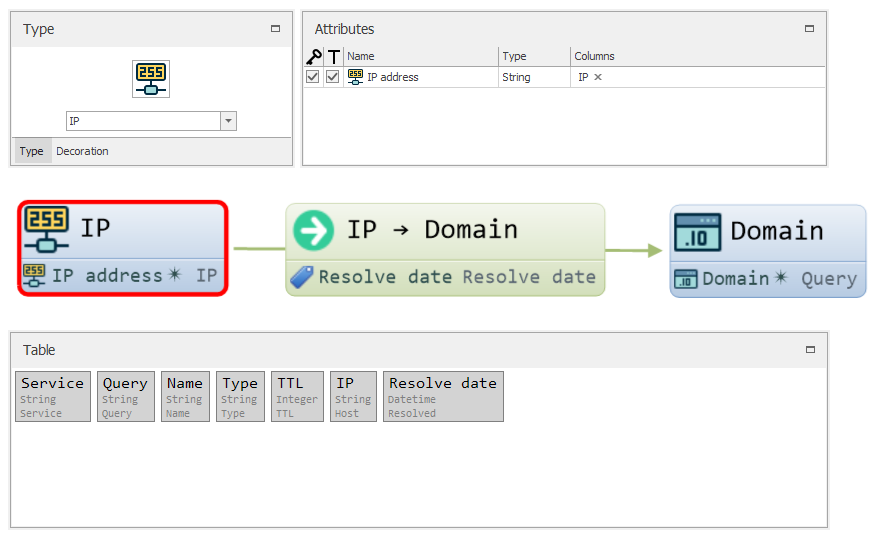
Header.Schema class is a Python analog of the Creation Template window, which allows you to describe a pattern of creating a graph for some table data.This is an example of some graph and its data table:
Data mapping
Note
You can map as many schemas as you want to one header.
Creating your own types for objects and links
You can describe your own types of objects, links and attributes in the code and even decorate them with icons of your choice. But to use Lampyre built-in types you need to import them from the Lighthouse ontology, where they are already implemented in Python code.
Here is an example of a small task and of creating a schema. https://macaddress.io has a simple API for looking up a hardware vendor by network interface MAC address - so the schema will consist of the “Vendor” and “MAC address” custom objects. Register on the website to gain an API access token and create a script for your task. Don’t forget to look into the API documentation to learn more about the response format - maybe you’d want to create a more enriched schema using this data.
Begin, as usual, with describing a Header for our task (based on the API response example):
from lighthouse import *
from ontology import Attributes
from requests import Session
from typing import Dict, Any


class VendorsHeader(metaclass=Header):
    display_name = 'Vendors'

    MacAddress = Field('MAC address', ValueType.String)
    Oui = Field('OUI', ValueType.String)
    IsPrivate = Field('Is private', ValueType.Boolean)
    CompanyName = Field('Company name', ValueType.String)
    CompanyAddress = Field('Company address', ValueType.String)
    CountryCode = Field('Country code', ValueType.String)
To describe a custom object type, the Object metaclass is used.
If you want to explicitly set your object name, use the reserved name field. Otherwise, the class name will be used as an object type name.
Describe your type attributes using the Attribute class. Attribute instances are not reusable - if you want to use the same attribute with numerous objects/links, call it’s clone() method or create a new instance.
Defining IdentAttrs and CaptionAttrs for your type is optional.
Utils is there to help you do this easily.base64string() can take relative path to your image and return the base64 string for you.Note
name, IdentAttrs, CaptionAttrs and Image are the reserved field names for the Object class.
Let’s describe object types for our schema:
class Vendor(metaclass=Object):
    Oui = Attribute('OUI', ValueType.String)  # unique vendor number
    IsPrivate = Attribute('Is private', ValueType.Boolean)
    CompanyName = Attribute('Company name', ValueType.String)
    CompanyAddress = Attribute('Company address', ValueType.String)

    IdentAttrs = [Oui]
    CaptionAttrs = [CompanyName]

    Image = Utils.base64string('icons8-factory-48.png')


class MacAddress(metaclass=Object):
    name = 'Mac address'

    # you can always use attributes from Lampyre ontology, if they meet your requirements
    MacAddress = Attributes.System.MacAddress

    IdentAttrs = [MacAddress]
    CaptionAttrs = [MacAddress]

    Image = Utils.base64string('icons8-electronics-48.png')
Link types are described almost the same way as object types, except they require two additional fields, describing the link’s begin and end types:
class VendorToMacAddress(metaclass=Link):
    name = 'Vendor of hardware'

    CompanyName = Attribute('Company name', ValueType.String)

    Begin = Vendor
    End = MacAddress
It is possible to create a simple link type without attributes by defining only begin and end object types:
class SimpleLine(metaclass=Link):
    Begin = BeginType
    End = EndType
Creating a schema
Schema class, where we use object and link types to create objects and links on a graph.SchemaObject and SchemaLink are used to describe the actual schema and data mapping between your types and header fields.class VendorsSchema(metaclass=Schema):
name = 'Hardware vendors'
Header = VendorsHeader
# "create object of type Vendor and map it's attributes to this header fields"
vendor = SchemaObject(Vendor, mapping={
Vendor.Oui: Header.Oui, Vendor.IsPrivate: Header.IsPrivate,
Vendor.CompanyName: Header.CompanyName, Vendor.CompanyAddress: Header.CompanyAddress,
})
macaddress = SchemaObject(MacAddress, mapping={MacAddress.MacAddress: Header.MacAddress})
connection = SchemaLink(VendorToMacAddress, mapping={VendorToMacAddress.CompanyName: Header.CompanyName},
begin=vendor, end=macaddress)
This schema is ready to go. In Lampyre’s creation template editor it will look like this:
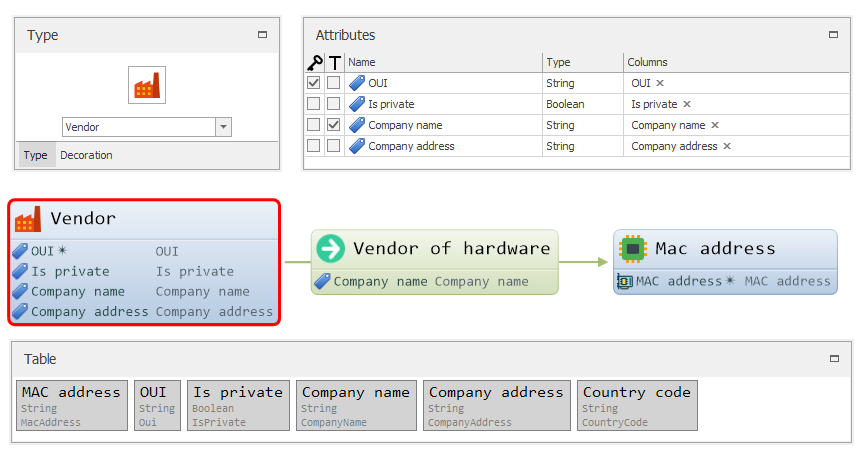
As you can see, object types have images we set for them and attributes are mapped to the corresponding header columns.
Note
You can map an attribute to many columns, just use list as the value in your mapping dictionary
class MacVendorsTask(Task):
    def __init__(self):
        super().__init__()
        self.token = 'YOUR_API_TOKEN'
Describe your enterparams the following way:
def get_enter_params(self):
    return EnterParamCollection(
        EnterParamField('addresses', 'MAC addresses', ValueType.String, is_array=True, required=True,
                        value_sources=[ValueSource(Attributes.System.MacAddress)])
    )
This is the most important part - you have to return your schema in get_schemas(). If your task has many schemas, return a SchemaCollection
def get_schemas(self):
    return VendorsSchema
Finally, create, a payload which will fill your table with values:
def execute(self, enter_params, result_writer, log_writer, temp_directory):
    session = Session()  # it is recommended to make many requests to one resource within one session
    session.headers.update({'X-Authentication-Token': self.token})

    for macaddress in set(enter_params.addresses):
        try:
            response = self.make_request(session, macaddress)
            vendor_details = response.get('vendorDetails', {})

            line = VendorsHeader.create_empty()

            line[VendorsHeader.MacAddress] = macaddress
            line[VendorsHeader.Oui] = vendor_details.get('oui')
            line[VendorsHeader.IsPrivate] = vendor_details.get('isPrivate')
            line[VendorsHeader.CompanyName] = vendor_details.get('companyName')
            line[VendorsHeader.CompanyAddress] = vendor_details.get('companyAddress')
            line[VendorsHeader.CountryCode] = vendor_details.get('countryCode')

            result_writer.write_line(line, header_class=VendorsHeader)

        except Exception as e:
            log_writer.info('Error requesting address: ' + macaddress)
            log_writer.info(e)

def make_request(self, session: Session, macaddress: str) -> Dict[str, Dict[str, Any]]:
    params = {'output': 'json', 'search': macaddress}
    return session.get('https://api.macaddress.io/v1', params=params).json()
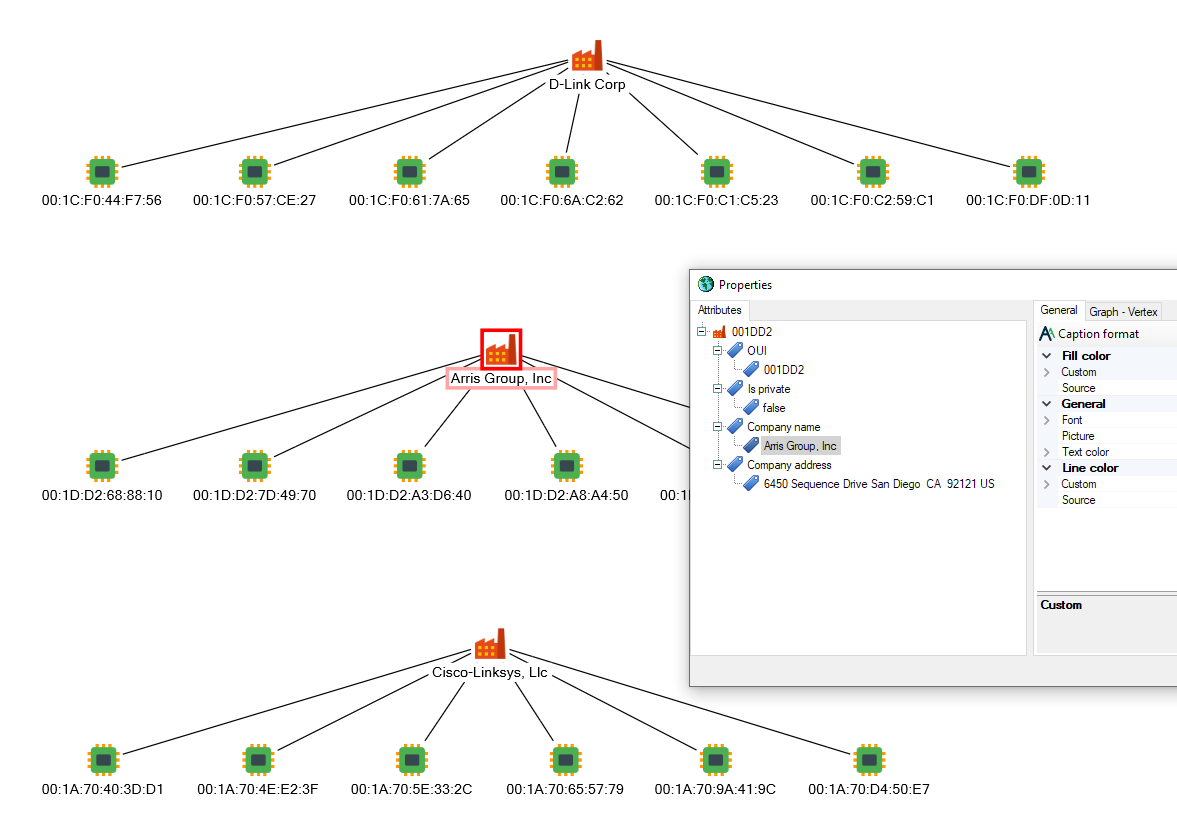
Put some MAC addresses to input parameters and execute your task. After completion, a Vendors schema will be available to you:
Additional features
Conditions
For schema links or objects you can set a conditions, describing when to create some object/link. Conditions are applied to header fields.
Condition constructor takes 3 arguments - header field, one of logical Operations (enum) and some constant (operand).
Note
Conditions for objects affects only standalone objects without links.
For example, you want to link MAC address and vendor only if vendor name is not empty (which is quite reasonable). To do this, you can create SchemaLink with following conditions:
# add condition list to link constructor
connection = SchemaLink(VendorToMacAddress, mapping={VendorToMacAddress.CompanyName: Header.CompanyName},
                    begin=vendor, end=macaddress,
                    conditions=[Condition(Header.CompanyName, Operations.NotEqual, '')])
When SchemaLink has such condition, link (and both ends) will appear only if CompanyName field is not equal to empty string.
You can also set a UnionMode between conditions - And or Or, and configure them to ignore string case:
connection = SchemaLink(VendorToMacAddress, mapping={VendorToMacAddress.CompanyName: Header.CompanyName},
                        begin=vendor, end=macaddress,
                        conditions=[
                            Condition(Header.CompanyName, Operations.NotEqual, ''),
                            Condition(Header.MacAddress, Operations.StartsWith, '00:1A:A9')
                        ],
                        condition_union_mode=UnionMode.And,
                        condition_ignore_case=True
                        )
Special attributes
There are some interesting attributes in system ontology, which can provide additional properties to your entities:
Attributes.System.Datetime: when object with such attribute is presented in schema, additional view - Timeline - is available for visualizing/filtering events time data.
Note
Datetime also shown in Content window in different forms, allowing you to filter entities on graph(map) by day of week or by time of day.
Attributes.System.GeoPoint: when such attribute mapped to columns with both latitude and longitude, map view becomes available for your schema, allowing you to view objects on map and create heatmaps, based on objects count.
Note
When entities has both Datetime and GeoPoint attributes, you can also visualize a path on a map.
Attributes.System.GeoPolygon: when mapped to column with geojson data, object with such attribute can represent polygon area on map.
Attributes.System.GeoLineString: when mapped to column with geojson data, object with such attribute can represent line on map.
Here you can see objects with both GeoPoint and Datetime attributes, represented as path on a map:
Icons for custom objects provided by Icons 8